• Skip to secondary menu
  • Skip to main content
  • Skip to primary sidebar

Kristina Rees, CreatingWithKristina.com

Independent Stampin' Up! Demonstrator

  • Home
  • Benefits of Joining
  • Shop With Me!
    • Shop Stampin’ Up!
    • Shop Tutorials
    • Must Have Tools
    • My Account
  • About Me
  • Contact Me
  • Events
  •  

Repetitive Stamping to Create a Blizzard of Fun

November 16, 2018 Leave a Comment

Affiliate links may be used in this post. I may receive a small commission at no extra cost to you if you make a purchase through my affiliate link

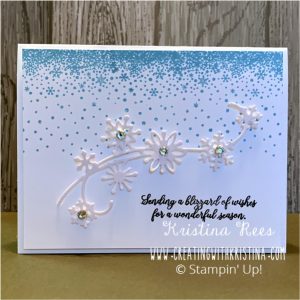
One of the coolest features of the Stampin’ Up! Stamparatus is its repetitive stamping ability.  In this card tutorial, I’m going to show you how to create a real blizzard of fun with the new stamp set Snow is Glistening and the best stamping tool the Stamparatus.
Repetitive Stamping with the Stamparatus 1

For this card, you will need

Product List

Snow Is Glistening Photopolymer Stamp Set

Snow Is Glistening Photopolymer Stamp Set
[149742]
$21.00

Snowfall Thinlits Dies

Snowfall Thinlits Dies
[149692]
$39.00

Whisper White 8-1/2" X 11" Thick Cardstock

Whisper White 8-1/2″ X 11″ Thick Cardstock
[140272]
$7.75

Whisper White 8-1/2" X 11" Card Stock

Whisper White 8-1/2″ X 11″ Card Stock
[100730]
$9.75

White Velveteen Sheets

White Velveteen Sheets
[149619]
$5.00

Rhinestone Basic Jewels

Rhinestone Basic Jewels
[144220]
$5.00

Mini Stampin' Dimensionals

Mini Stampin’ Dimensionals
[144108]
$4.00

Stampin' Dimensionals

Stampin’ Dimensionals
[104430]
$4.00

Stamparatus

Stamparatus
[146276]
$49.00

Balmy Blue Classic Stampin' Pad

Balmy Blue Classic Stampin’ Pad
[147105]
$7.50

Tuxedo Black Memento Ink Pad

Tuxedo Black Memento Ink Pad
[132708]
$6.00

Repetitive Stamping Measurements

  • card base 8-1/2″ x 5-1/2″
  • whisper white 4″ x 5-1/2″
  • white velvet 3-1/2″ x 5″

Repetitive Stamping Instructions

  1. position your white cardstock on the Stamparatus and secure with magnets
  2. place blizzard of snow stamp face down in the top left corner of the cardstock
  3. lower stamparatus plate to pick up stamp
  4. ink stamp and then lower plate again to stamp
  5. move stamparatus plate two notches, ink again and stamp
  6. repeat two more notches, ink and stamp a third time
  7. place the falling snow stamp face down on the left edge of the cardstock just below the blizzard
  8. flip Stamparatus plate over and pick up stamp
  9. ink and stamp 3 times moving two notches each time
  10. cut out white velvet paper with the snow flurry die
  11. attach snow flurry with mini dimensionals
  12. stamp sentiment in the lower right corner of the cardstock
  13. stick rhinestones in the center of the snowflakes on the snow flurry
  14. Use large dimensionals to adhere card layer to card base

Repetitive Stamping


Repetitive Stamping

I’ve been having so much fun with this stamp set! Here is another post I wrote using the Falling Snow Thinlit Dies, Rock Salt Watercolor Tutorial
Thanks for stopping by. I always appreciate hearing from you. Let me know if you ever have any questions or suggestions.
I hope you have a beautiful and creative day.
Signature for Blog

Filed Under: Tips & Tutorials Tagged With: repetitive stamping, snow is glistening

Subscribe

Hi, I'm Kristina! I help paper crafters create beautiful handmade cards with confidence so they can bless family and friends with something made from the heart. Contact Me

Reader Interactions

Leave a Reply Cancel reply

Your email address will not be published. Required fields are marked *

Primary Sidebar

Welcome!

Kristina Rees, Stampin' Up! Demonstrator


Kristina Rees


Stampin' Up!
Demonstrator

Helping you create beautiful cards, scrapbook pages, and handmade gifts that connect people you love.


Let's Connect!

  • Email
  • Facebook
  • Instagram
  • Pinterest
  • YouTube
Subscribe Button
Kristina Rees, Shop My Online Store

CLICK here to see the May 2026 Catalog

Stampin' Up! Catalog

Search

Archives

Kristina Rees, Disclaimer

The content of this site is the sole responsibility and opinions of Kristina Rees as an Independent Stampin' Up! Demonstrator and the use of its content, classes, services, and/or products offered is not endorsed by Stampin' Up! Stamped images are copyright Stampin' Up!

View My Privacy Policy
Content © Kristina Rees, all rights reserved. Wordpress Genesis Framework customized by WebsByAmy, LLC