Affiliate links may be used in this post. I may receive a small commission at no extra cost to you if you make a purchase through my affiliate link
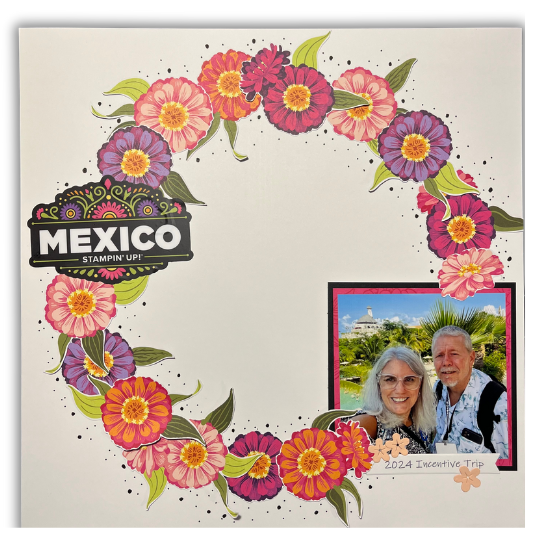
Welcome to “Craft Your Journey: Build the Ultimate Travel Album”! It’s been a while since we’ve dived into scrapbooking together, and I’m thrilled to guide you through crafting a beautiful project album. Today, we’re starting with a very special scrapbook—a travel album documenting my recent trip to Mexico, an incredible incentive trip I earned last year. Whether you’re new to scrapbooking or picking it back up, this video will cover the basic principles of creating a stunning travel album. Plus, I’m excited to share that Stampin’ Up! is launching a complete 12×12 scrapbook product line this September. So, let’s get our creative juices flowing and embark on this scrapbook journey together!
I’ll first go over a simple outline for getting started on your project album then join me as I create a title page for my album that you can adapt for any project album you may be making.
- Choose Your Theme and Purpose: Decide on the theme of your album. For a travel album, the theme might be a specific trip or exploring different destinations over time. For a baby album, you could focus on the first year, milestones, or a baby shower.
- Select an Album Size and Style: Choose the size and style of your scrapbook. Common sizes include 12×12 inches, 8×8 inches, or mini albums. Decide if you want a post-bound, ring-bound, or book-bound album.
- Keep it all in one place: Get a project box and notebook to keep all your thoughts and planning in one place.
- Photos: Print them all or print as you go. Either way sort them.
- If you print them all at once, find a photo file box with dividers
- If you print as you go, use computer file folders to organize into days or events
- Gather Your Supplies: Collect all the supplies you’ll need:
- Papers and Cardstocks: Choose colors and patterns that complement your theme.
- Adhesives: Such as tape runners, glue dots, or double-sided tape.
- Cutting Tools: Scissors and craft knives.
- Embellishments: Stickers, die-cuts, washi tape, and any themed decorations.
- Plan Your Layouts: In your notebook make a list of what pages you want to create and what order you want them. Sketch out a few page layouts to plan where your photos, texts, and embellishments will go. This helps you visualize the final look and ensures a cohesive design.
- Organize Memorabilia: Put the memorabilia with the photos they will go with. Make notes where it will appear in the album. Include tickets, brochures, or other memorabilia for a travel album; for a baby album, consider adding ultrasound photos, hospital bracelets, and greeting cards.
- Create Your Pages: Start by placing the background papers. Next, add your photos, followed by titles, journaling, and finally, embellishments. Use photo corners or mats to highlight special photos.
- Add Journaling: Include stories about the photos, like dates, locations, and people’s names, or write about how you felt during those moments. This can be handwritten or printed.
- Incorporate Interactive Elements: Consider adding pockets for extra photos or hidden journaling, fold-outs, or even envelopes to store additional keepsakes.
- Review and Rearrange: As your album progresses, step back and review your work. Make adjustments to layouts or swap elements around if needed.
- Preserve and Protect: Once completed, store your scrapbook in a dry, cool place to protect it from sunlight and dust. Use page protectors to keep your work in pristine condition.
Title Page

I watch you all the time and am really excited about the scrapbooking segments. I do have a couple questions though. I want to try the paper pumpkin but want to know what the theme is before I order so is it possible to find out before hand? My other thing is I am a big Texas Blue bonnet fan (Longhorns too) and I can not find a decent detailed blue bonnet stamp. can you help me.
Thank you in advance. Just watched the pop up card so cute .