• Skip to secondary menu
  • Skip to main content
  • Skip to primary sidebar

Kristina Rees, CreatingWithKristina.com

Independent Stampin' Up! Demonstrator

  • Home
  • Benefits of Joining
  • Shop With Me!
    • Shop Stampin’ Up!
    • Shop Tutorials
    • Must Have Tools
    • My Account
  • About Me
  • Contact Me
  • Events
  •  

Dual Delight: Unveiling the Charm of the Collar Fun Fold Card

February 9, 2024 4 Comments

Affiliate links may be used in this post. I may receive a small commission at no extra cost to you if you make a purchase through my affiliate link

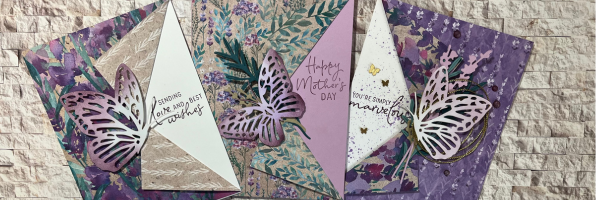
Ever found yourself at a crossroads, unable to choose which side of your gorgeous Designer Series Paper to showcase? The beauty on both sides calls to you, each pattern and color weaving its own story. Today, I’m thrilled to guide you through a captivating journey with a fold that’s not just fun but ingeniously simple – the Collar Fun Fold Card.

This fold is a game-changer, especially for those moments when you wish you could display both sides of your precious paper. Not only does it solve the age-old dilemma of choice, but it also transforms your card-making into an art form that celebrates every inch of your beautiful materials.

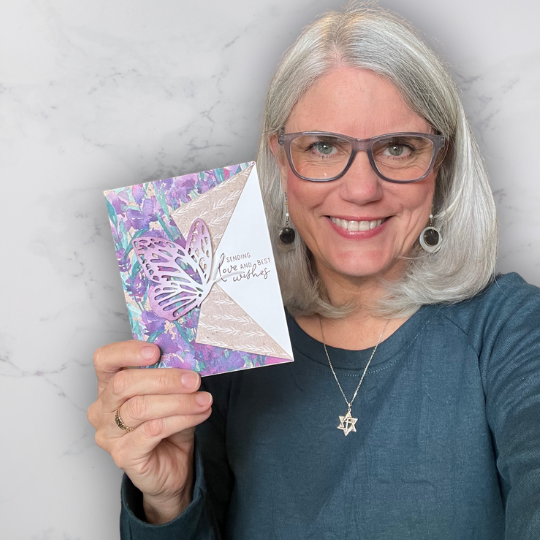
Ideal for framing a roundish focal point, approximately 2 inches in diameter, this fold elevates your projects to new heights of elegance. Whether you’re looking to add a touch of sophistication to your cards or simply want to make the most out of your Designer Series Paper, the Collar Fun Fold Card is your ticket to a world where every fold is a story waiting to be told.

Join me as we unfold the magic, step by step, and turn those indecisive moments into a showcase of creativity and charm.”
Measurements

  • Card Base 8-1/2″ x 5-1/2″ scored at 4-1/4″
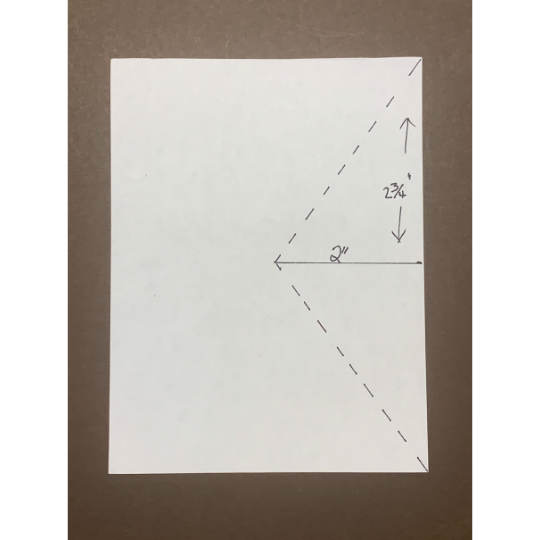
  • DSP layer 4-1/4″ x 5-1/2″ cut 2″ at the long center (2-3/4″)
  • Scraps for stamping and cutting out images
Supplies

  • Fold back corners of the DSP to reveal the opposite side
  • Lay the DSP down on the card front and mark with pencil where the opening is and stamp sentiment on the card base . Erase the pencil marks.
  • Adhere the DSP to the card base and tack down the corners with Stampin’ Dimensionals
  • Create a focal image (I used Butterflies and Painted Lavender listed below)
  • Adhere image to the corner of the folds
  • Add embellishments
Product List
Painted Lavender Dies
[162596]
$32.00
Perennial Postage Cling Stamp Set (English)
[162598]
$24.00
Perennial Lavender 12" X 12" (30.5 X 30.5 Cm) Designer Series Paper
[162593]
$12.50
Fresh Freesia 8 1/2" X 11" Cardstock
[155613]
$10.00
Basic White 8 1/2" X 11" Thick Cardstock
[159229]
$9.00
Blackberry Bliss Classic Stampin' Pad
[147092]
$9.00
Gorgeous Grape Classic Stampin' Pad
[147099]
$9.00
Highland Heather Stampin' Blends Combo Pack
[154887]
$10.00
Small Blending Brushes
[160518]
$12.00
Paper Butterfly Accents
[162612]
$8.00
Simply Elegant Trim
Simply Elegant Trim
[155766]
$7.50
Brushed Brass Butterflies
[158136]
$10.00
Purple Fine Shimmer Gems
[162611]
$8.00

Filed Under: Fun Fold Cards Tagged With: Butterfly Card, Fun Fold Card

Subscribe

Hi, I'm Kristina! I help paper crafters create beautiful handmade cards with confidence so they can bless family and friends with something made from the heart. Contact Me

Reader Interactions

Comments

  1. Linda Carver says

    February 10, 2024 at 1:17 pm

    made a card from this past Friday fun fold video. Looking through dspbto create another.

    Reply
    • Kristina says

      May 4, 2024 at 7:11 pm

      That’s wonderful to hear! I’m thrilled that you felt inspired by the Fun Fold Friday video to create your own card. It sounds like you’re having a great time exploring your designer paper stash—there’s always something new to discover, right? I’d absolutely love to see your creations if you’d like to share them on our Facebook Group Kristina’s Creative Stampers. Keep up the fantastic work, and happy crafting!

      Reply
  2. Carol says

    April 30, 2024 at 1:46 pm

    The perfect card to use up the two sided papers and I love your ways of embellishing them. So very pretty.

    Reply
    • Kristina says

      May 4, 2024 at 7:08 pm

      Thank you so much! I’m really glad you enjoyed the tutorial and found it useful for those two-sided papers. It’s always fun to find creative ways to use every scrap, isn’t it? I’d love to see how you’ve used your embellishments if you ever want to share your creations with us on our Facebook Group Kristina’s Creative Stampers. Happy crafting!

      Reply

Leave a Reply Cancel reply

Your email address will not be published. Required fields are marked *

Primary Sidebar

Welcome!

Kristina Rees, Stampin' Up! Demonstrator


Kristina Rees


Stampin' Up!
Demonstrator

Helping you create beautiful cards, scrapbook pages, and handmade gifts that connect people you love.


Let's Connect!

  • Email
  • Facebook
  • Instagram
  • Pinterest
  • YouTube
Subscribe Button
Kristina Rees, Shop My Online Store

CLICK here to see the May 2026 Catalog

Stampin' Up! Catalog

Search

Archives

Kristina Rees, Disclaimer

The content of this site is the sole responsibility and opinions of Kristina Rees as an Independent Stampin' Up! Demonstrator and the use of its content, classes, services, and/or products offered is not endorsed by Stampin' Up! Stamped images are copyright Stampin' Up!

View My Privacy Policy
Content © Kristina Rees, all rights reserved. Wordpress Genesis Framework customized by WebsByAmy, LLC