• Skip to secondary menu
  • Skip to main content
  • Skip to primary sidebar

Kristina Rees, CreatingWithKristina.com

Independent Stampin' Up! Demonstrator

  • Home
  • Benefits of Joining
  • Shop With Me!
    • Shop Stampin’ Up!
    • Shop Tutorials
    • Must Have Tools
    • My Account
  • About Me
  • Contact Me
  • Events
  •  

Split Panel Card Tutorial

November 4, 2022 2 Comments

Affiliate links may be used in this post. I may receive a small commission at no extra cost to you if you make a purchase through my affiliate link

For today’s Fun Fold Friday I am going to show you how easy it is to make a Split Panel Fun Fold Card.
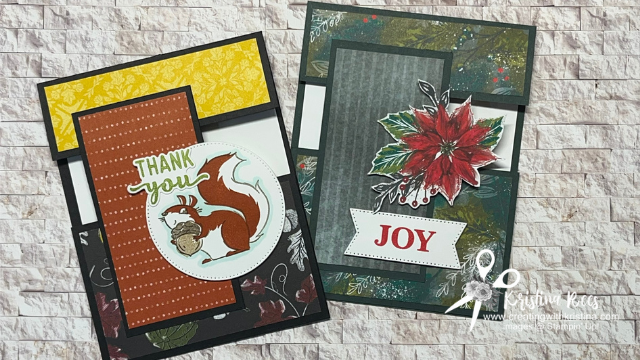
Measurements

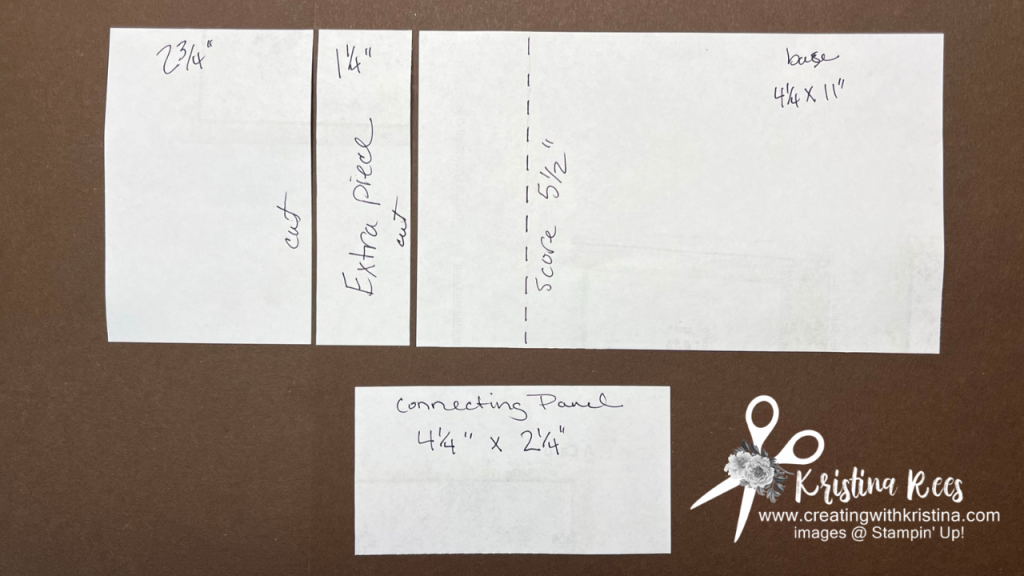
  • Card base Evening Evergreen 4-1/4″ x 11″ and 4-1/4″ x 2-1/4″
  • White cardstock 4″ x 5-1/4″ and scraps
  • Boughs of Holly Designer Paper 4″ x 2-1/2″; 4″ x 1-1/4″ and connecting piece 4″ x 2″
Instructions

  • Glue or tape Designer Paper to the card base
  • Connect the bottom of the card and connecting panel about 1/2″ in from the left corner
  • Then Glue the connecting panel to the card
  • Fussy cut a poinsettia from the DSP and attach with Dimensionals
  • Stamp and cut out and adhere sentiment
  • Don’t forget the inside and envelope
Product List
Boughs Of Holly 12" X 12" (30.5 X 30.5 Cm) Designer Series Paper
[159600]
$12.00
Evening Evergreen 8 1/2" X 11" Cardstock
[155574]
$9.25
Basic White 8 1/2" X 11" Cardstock
[159276]
$10.25
Merriest Moments Photopolymer Stamp Set (English)
[156353]
$22.00
Real Red Classic Stampin' Pad
[147084]
$8.00
Stylish Shapes Dies
Stylish Shapes Dies
[159183]
$30.00
Paper Trimmer
Paper Trimmer
[152392]
$25.00

Happy weekend and happy crafting!

purchase $50 and up/add the host code/get a thank you gift from me

Filed Under: Fun Fold Cards Tagged With: Christmas Cards, Fun Fold Card

Subscribe

Hi, I'm Kristina! I help paper crafters create beautiful handmade cards with confidence so they can bless family and friends with something made from the heart. Contact Me

Reader Interactions

Comments

  1. Karen Nichols says

    November 6, 2022 at 2:36 pm

    I really enjoyed making this card after watching your tutorial. Your instructions are clear and easy to understand. Thank you for the hard work you put into each tutorial.

    Reply
    • Kristina says

      November 6, 2022 at 5:57 pm

      I am so glad you found the tutorial helpful. Thank you for following me

      Reply

Leave a Reply Cancel reply

Your email address will not be published. Required fields are marked *

Primary Sidebar

Welcome!

Kristina Rees, Stampin' Up! Demonstrator


Kristina Rees


Stampin' Up!
Demonstrator

Helping you create beautiful cards, scrapbook pages, and handmade gifts that connect people you love.


Let's Connect!

  • Email
  • Facebook
  • Instagram
  • Pinterest
  • YouTube
Subscribe Button
Kristina Rees, Shop My Online Store

CLICK here to see the September 2026 Catalog

Stampin' Up! Catalog

Search

Archives

Kristina Rees, Disclaimer

The content of this site is the sole responsibility and opinions of Kristina Rees as an Independent Stampin' Up! Demonstrator and the use of its content, classes, services, and/or products offered is not endorsed by Stampin' Up! Stamped images are copyright Stampin' Up!

As an Amazon Associate I earn from qualifying purchases.

View My Privacy Policy
Content © Kristina Rees, all rights reserved. Wordpress Genesis Framework customized by WebsByAmy, LLC